Difference between revisions of "Widig-801 QuickStart iOS"
| Line 1: | Line 1: | ||
| − | The instructions below show the BLE MIDI connection procedure in GarageBand, but any other CoreMIDI enabled application will have a similar menu for pairing to BLE MIDI devices. These instructions assume the WiDig's BLE is enabled. The WiDig's blue LED will blink slowly to indicate its BLE is enabled and available for a connection. Once connected via BLE the blue LED will be steady on. To enable the WiDig's BLE, see [[Connect]] QuickStart. | + | The instructions below show the BLE MIDI connection procedure in GarageBand, but any other CoreMIDI enabled application will have a similar menu for pairing to BLE MIDI devices. These instructions assume the WiDig's BLE is enabled. The WiDig's blue LED will blink slowly to indicate its BLE is enabled and available for a connection. Once connected via BLE the blue LED will be steady on. If the blue LED not slowly blinking BLE is not enabled. To enable the WiDig's BLE, see [[Connect]] QuickStart. |
Revision as of 01:41, 9 July 2025
The instructions below show the BLE MIDI connection procedure in GarageBand, but any other CoreMIDI enabled application will have a similar menu for pairing to BLE MIDI devices. These instructions assume the WiDig's BLE is enabled. The WiDig's blue LED will blink slowly to indicate its BLE is enabled and available for a connection. Once connected via BLE the blue LED will be steady on. If the blue LED not slowly blinking BLE is not enabled. To enable the WiDig's BLE, see Connect QuickStart.
GarageBand Specific Menu
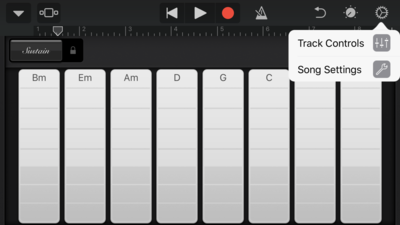
1. In GarageBand, from an instrument window, click on the gear icon on the top right and select Song Settings:
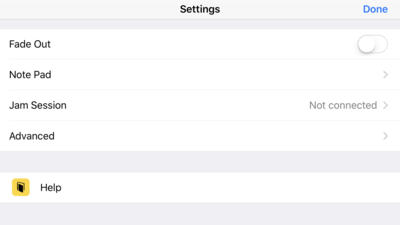
2. Then, scroll down the menu and select "Advanced":
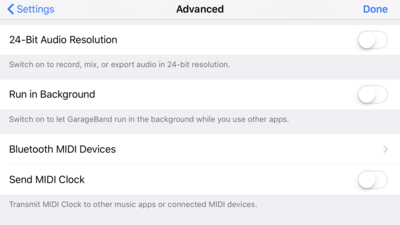
3. From there, select Bluetooth MIDI devices
Connect to the BLE MIDI Port
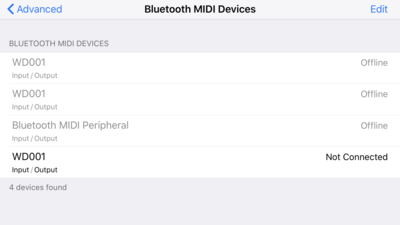
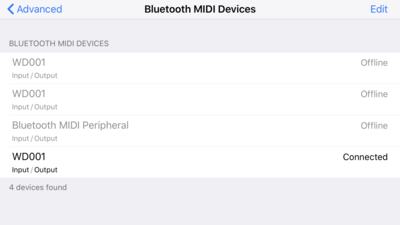
4. Finally, connect to the WiDig by selecting it from the list of devices:
5. The WiDig is now connected! You can now press < back and start using the WiDig with GarageBand!
